Edible Ink Printing for Cakes, Cookies & Coffee Foam
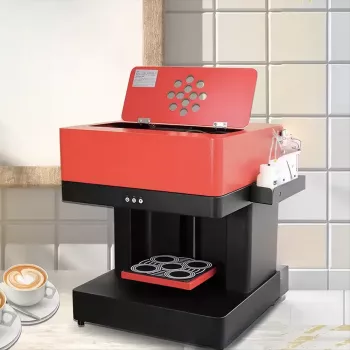
Edible Ink Printer for Cakes, Coffee, and More
Personalized desserts and drinks go from time-consuming handwork to repeatable results with an edible ink printer. From wafer paper toppers and frosting sheets to drink foam prints, the right setup helps create consistent images, logos, and messages for birthdays, weddings, cafés, and catering. For anyone building a more reliable workflow for custom orders, the Edible Ink Printer for Cakes, Coffee, and More is designed to turn digital designs into edible decorations with less trial-and-error.
What It Can Create Across Desserts and Drinks
An edible printing setup is essentially a small production tool: you design once, then print consistent results across many items. That consistency matters for high-volume weekends, corporate events, and menus that rely on brand recognition.
- Cake toppers and plaques: Print images on frosting sheets or wafer paper, then apply to buttercream, fondant, or ganache surfaces.
- Cupcakes and cookies: Print small logos, photos, or themed icons and cut to size for quick batch decorating.
- Coffee and milk-based drinks: Print on foam or on edible toppers designed for beverages, depending on the serving style and durability needed.
- Event branding: Repeatable logo placement for corporate events, branded dessert tables, and café promotions.
- Short-run customization: Quick personalization for names, dates, and photo desserts without ordering pre-printed sheets.
Common applications and typical print media
| Use case | Best-fit edible media | Notes for clean results |
|---|---|---|
| Photo cake | Frosting sheet | Apply to a smooth, slightly tacky surface; avoid condensation |
| Crisp toppers | Wafer paper | Best on firm icings; can curl with high moisture |
| Logo cookies | Frosting sheet or wafer paper | Seal on dry cookies; minimize grease on surface |
| Cappuccino art | Foam printing or edible topper | Serve quickly; foam deflates over time |
How Edible Printing Works (and What You Need)
Edible printing is straightforward once the components are matched correctly. The biggest problems usually come from mixing non-food materials into the workflow, or from printing in a steamy kitchen area where moisture ruins the finish.
- Printer + edible ink: Edible ink is formulated for food contact and behaves differently than standard dye inks; use only ink intended for edible printing.
- Printable media: Frosting sheets and wafer paper are the most common; store sealed to prevent drying or humidity absorption.
- Food-safe handling: Use clean, dry hands or food-safe gloves; keep printed sheets away from steam, splashes, and high humidity.
- Design files: High-contrast images print more clearly; lighter colors may appear softer on edible media than on photo paper.
- Workflow tip: Print, allow to set briefly, then apply—especially for frosting sheets to reduce smearing.
If you’re building a menu around printed elements (logos on cookies, photo cake upgrades, or branded drink moments), consider pairing production tools with an environment that supports presentation. For cafés and dessert counters, warm lighting can make printed details look sharper and more premium; the Modern Handmade Rattan LED Pendant Lamp – Artisanal Elegance for Home & Hospitality is one option for front-of-house ambiance.
Setup and Daily Use for Reliable Results
Edible printing rewards routine. A few small habits—where the printer sits, how often you run a test pattern, and how you store sheets—make a bigger difference than constantly tweaking designs.
For busy weeks with multiple custom orders, it helps to keep your process predictable: maintain a small folder of “print-ready” templates (logo placements, cupcake circles, cookie tags), and print extras of frequently used elements so you aren’t restarting a file for every order. On the personal side, long production days can also add up; some sellers keep a wind-down routine or a short relaxation plan on hand, such as Unlock Deep Sleep and Lasting Calm | Stress Relief Sleep Guide, to stay consistent during peak seasons.
Care, Storage, and Food Safety Considerations
Because edible printing touches food-contact materials, treat it like any other ingredient station: clean tools, controlled storage, and clear labeling. In the U.S., color additives and ingredient compliance can matter for commercial operators and special orders; the FDA’s guidance on food ingredients and colors is a helpful reference point.
For allergy-aware orders, use a clear intake checklist (requested ingredients, avoidance list, cross-contact notes) and reference reliable sources like the USDA FSIS overview on food allergies. Even if you’re not changing ingredients, customers may ask whether a printed topper contains gelatin or specific starches—labels matter.
Quick Comparison of Print Media
| Media | Strength | Watch-outs |
|---|---|---|
| Frosting sheet | Best for photos and gradients | Can smear if applied to wet surfaces |
| Wafer paper | Cuts clean; good for toppers | Curling in humidity; colors can look lighter |
| Foam print (drink) | Instant visual impact | Foam collapses; serve immediately |
When This Tool Makes the Most Sense
FAQ
Can edible images be placed on buttercream and whipped toppings?
Yes—buttercream works best when it’s smooth and only slightly tacky, while whipped toppings tend to be wetter and can soften the image faster. Avoid condensation (especially on chilled cakes), and apply the printed sheet close to delivery or serving time for the cleanest edges.
Why do colors look different on frosting sheets than on a screen?
Edible media absorbs ink differently than photo paper, and screens are backlit, which makes colors appear brighter than they’ll print. If your results look muted, increase brightness/contrast in the artwork and use higher-contrast images to preserve detail.
How should edible ink and sheets be stored between jobs?
Keep inks sealed, within their recommended dates, and away from heat or direct sunlight. Store sheets flat in a sealed package to control humidity, and run periodic test prints so ink doesn’t dry in the nozzles during slower weeks.













Leave a comment